Tuesday, November 29, 2011

Chocolate Cherry Cream Cake


Today was my oldest sister's 23rd birthday (Happy B-day, Q!). See her work on her blogs - Got Down Syndrome, Hoppin' Herd of Hares and Country Girl Web Design)

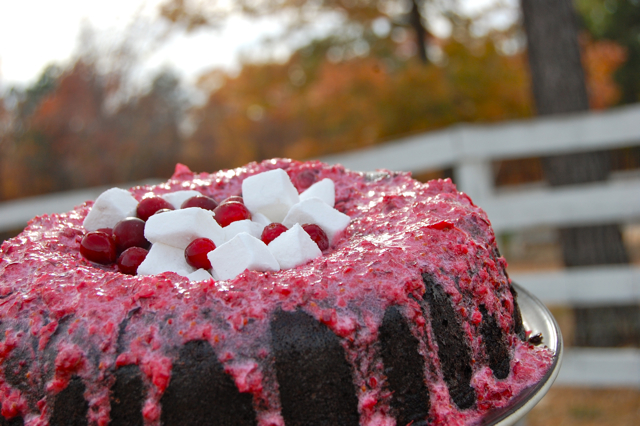
Maybe not exactly pretty, but a nice mess.

With some cherries on hand and a instant pudding recipe I created yesterday (made in the Vita-Mix, with a surprise ingredient - yes, we are having fun with this "blender on steroids" ;) ), I made this cake today for her birthday. But after adding the second layer of moist oat flour chocolate cake - that crumbled, and I thought it was going to be a disaster. But, I poured some cherry sauce over the pudding mess and added the third layer of cake - it ended up holding together pretty well.

Moist chocolate cake oozing with puddin' and cherry sauce.
So, after all this turned out pretty good - very moist chocolate cake, vanilla pudding, cherries and toppings don't hurt ;). I decided against using frosting, and I think it was sweet enough without. You could go the frosting route, but I think it would be pretty rich - is that a bad thing? It just depends on what you're in the mood for ;). In other words, feel free to cover it in rich ganache, or just throw on some chocolate chips and cherries.


Chocolate Cherry Cream Cake (Gluten, Dairy, Corn-free)
Hanunyah Creation

3 11-inch round layers of oat flour chocolate cake (3 times the recipe)

Cream Filling:
1 3/4 cups cooked rice
1/4 cup sugar
1 to 2 tablespoons vanilla
3/4 to 1 cup water


Cherry Filling:
1 cup fresh or frozen cherries
1/4 cup water
3 tablespoons sugar

1. Combine all cream filling ingredients in the Vita-Mix. Blend on high for a couple minutes, adding enough water until smooth and desired consistency is reached. Cool.

2. In a small saucepan, combine all cherry filling ingredients over medium-high heat. Stir until it comes to a boil and is thick. Cool.

3. To assemble - place one cooled cake layer, bottom side up, on a large platter. Set aside. Pour the cream filling on top of the cake layer on the platter. Top with the second layer of cake. Spread the cherry filling over that. Place the remaining cake over that and top with frosting or whatever you want - chocolate chips, cherries, marshmallows, etc.

A sticky mess with some kind of weird gap in there . . . 


~ Hanunyah

Monday, November 28, 2011

Whoopie Pies


There are many kinds of whoopie pies - pumpkin, red velvet, peanut butter, banana, etc. There are so many kinds that there are books with just whoopie pie recipes. But, the traditional is made with soft chocolate cookies and vanilla cream filling.

I am learning how to bake with oat flour. It is very interesting. Gluten-free baking in general (let alone "regular" baking) is kitchen science . . . much to learn. I have just touched the tip of the iceberg, so to speak. You have to learn to expand your horizon, not just follow recipes. That's when it gets fun. You'll most likely have flops somewhere along the line, but finally success comes in if you press on.


For the filling, I made a simple powdered sugar frosting: Beat together a few tablespoons lard or shortening and about 3 cups powdered sugar, adding enough water for the right consistency. Add about a teaspoon or more vanilla.


Whoopie Pies (Gluten, Dairy, Corn-free)
Adapted from Epicurious.com


1/2 cup lard
1 cup sugar
1 large egg
1 teaspoon vanilla
2 cups oat or other gluten-free flour
1/2 cup dark cocoa powder
1 1/4 teaspoons baking soda*
1 teaspoon salt
1 cup water

1. Preheat oven to 350°F.

2. Beat together lard and sugar in a large bowl, then add egg, beating until combined well. Add remaining ingredients and mix well.

3. Drop by teaspoonfulls (or whatever size you want) onto large greased baking sheets. Bake in preheated oven for 8 to 14 minutes (depending on size of cookies), until the top is set. Transfer with a metal spatula to a rack to cool completely.

4. Spread filling on bottom side of half of cookies. Top with remaining cookies.

Notes:
*The first few I baked I left the baking soda out to see how they would do. I later added some baking soda to the batter. But, I liked how the ones turned out without the baking soda - they held together way better than the ones with the baking soda. The ones with the baking soda were puffier, but if I made these again I probably would not use the baking soda, unless using some kind of gum to hold them together.


~ Hanunyah

Sunday, November 27, 2011

Impossible Pumpkin Pie (Crustless)

Still warm from the oven, I ran outside with the pie and a cute turkey pot-holder to take a picture.
Pumpkin pie - without the crust is called an "Impossible Pie". Though a nice crust is great, it is much easier to add a simple 1/2 cup of oat flour (or other gluten-free flour) to the pie "batter" - and it turns out awesome! Now you have a creamy pumpkin pie in a easy-as-cake type of deal! And add some crunch with nuts . . . but that's optional.


Impossible Pumpkin Pie (Gluten, Cow Dairy, Corn-free, GAPS adaptable*)
Adapted from Ginger Lemon Girl


3/4 cup sugar -or- 1/2 cup honey
1/2 teaspoon sea salt
2 teaspoons cinnamon
1 teaspoon ginger
1/2 teaspoon cloves
1/2 cup gluten-free flour -or- 3 tablespoons almond flour
1/2 teaspoon baking soda
2 large eggs
1 cup goat milk -or- plain, homemade yoghurt
1 3/4 cups pumpkin puree**
2 tablespoons vegetable oil -or- cold-pressed olive oil
nuts, optional

1. Preheat oven to 350 degrees. 


2. In a large bowl whisk together all ingredients thoroughly into a smooth batter. Pour into a large, greased 9" pie plate. If desired, top with nuts such as pecan or walnut halves (we used raw peanuts for the GAPS ones). 


3. Bake in the 350 degree oven for 30-40 minutes until set in the middle. The pie will only jiggle slightly in the middle when done and a toothpick inserted in the middle should come out mostly clean. Allow pie to cool for about an hour, then slice and serve.


Notes:
*To make this GAPS legal, use all of the substitutions indicated in the recipe as "-or-". Also be sure that all of the spices and baking soda have no additives, and that the eggs are GAPS-approved.
**1 3/4 cups pumpkin puree is the same as one 15 ounce can.


~ Hanunyah

Friday, November 25, 2011

Oatmeal Creme Pies

Crunchy, chewy, creamy sweet treats - CCC's? (crunchy, chewy, creamy ;) ).
I hope you had a good Thanksgiving! Here is a recipe for one of the cookies I made. It took a few tries for these to come out good, but once they did they were great! These are like Little Debbie's Oatmeal Creme Pies (without the additives). They were gone pretty fast.


For the filling, I just made a simple powdered sugar frosting: Beat together a few tablespoons lard or shortening and about 3 cups powdered sugar, adding enough water for the right consistency. Add vanilla and maybe some spices - to taste ;).

Oatmeal Creme Pies (Gluten, Dairy, Corn-free)
Adapted from Sugar Bananas


1 cup lard (or shortening)
1 1/4 cups sugar (brown or white)
2 tablespoons molasses or sorghum syrup
1 teaspoon vanilla, optional
2 eggs
1 1/2 cups oat flour
2 teaspoons cinnamon
1/2 teaspoon ginger
1/2 teaspoon nutmeg
1 1/2 cups safe quick oats

1. Preheat oven to 350 degrees F.

2. Cream lard, sugars, molasses and vanilla. Add eggs one at a time, mixing completely after each addition. Add remaining ingredients and mix until well combined.

3. Drop small teaspoons onto greased cookie sheets. Bake for 6 to 9 minutes (depending on how big they are), until set on top. The bottoms will be medium to dark brown.


~ Hanunyah


P.S. We've had a few long nights = my brain is tired, so don't expect long posts the next few days ;).


Linked to Foodie Friday and Frugal Friday
        The Shabby Nest

Thursday, November 24, 2011

Thanksgiving


There are many things to be thankful for. During this day of giving of thanks, let us not forget to . . . give thanks. We are so blessed, there are countless "things to be thankful for". Just a few that come to mind for me are: living in a free country (though it may not seem very free anymore, it really is. Just look at North Korea) - namely Oklahoma, living on a ranch with animals that produce food for us, a warm house ready for winter, helpful and hard-working brothers, my little brother that doesn't cease to make us laugh, being one of seven sisters . . . the list goes on, but I am very thankful for my large family and the ranch God has given us in OK, teaching me to fear God, be responsible, and be thankful for the little things that happen everyday - Such as my little brother that has DS, he puts a smile on our faces when he waves from the balcony in the morning when he gets up, or my other brother who is always excited when there is some kind of kitchen flop awaiting him.

Have a happy, thankful Thanksgiving! We are hoping to have Thanksgiving here at our house this year . . . with the neighbors, family and friends. That way it is easy to control what food is brought - it is hard when we go to other people's houses, because my little brother is very sensitive to cow dairy - even a drop of butter on his hand and he'll break out in a rash . . . let alone if he eats any. It is scary - he has choking episodes (where he can't breath) that he could very well die of. That's what I mean by scary. It is that bad.

Anyway, here are some recipes that would be great for your Thanksgiving meal. I hope to post about our thanksgiving day in the next few days. Have a happy allergen-free Thanksgiving!
Sorry these recipes are somewhat jumbled . . . I need to go. For more recipes, you may go to my Recipe Archives.

Fudge Brownies
Maple Walnut Bars
Cinnamon Swirls
Apple Muffins
Brown Sugar Cinnamon Coffee Cake
Pumpkin Roll
Sweet Potato Cake
Mashed Potato Fudge
Lollipop/Suckers
Black Gold Cookies (you gotta include something chocolate, right? These are AWESOME!)
Gingersnap Cookies
Molasses Cookies
Pumpkin Cookies
PumpkinSnap Cookies
Banana (or fruit) Ice-Cream (isn't ice-cream welcome?)
Layer Bars (like Seven Layer Bars!)
Oatmeal Cookies 2
Apple Pie, Mock
Fudge Pie
Bread Pudding
Pumpkin Buckle
Pumpkin Pudding
Pumpkin, Zucchini or Apple Bread
Autumn Pumpkin Spice Fudge


Remember to always be thankful . . . 
~ Hanunyah

Tuesday, November 22, 2011

Triple Cute Blog Award

Michelle from The G-Free Wifey gave me and 6 other bloggers the Triple Cute Blog Award! Thanks Michelle!!


When you receive the award you're supposed to pass it on to 7 other bloggers . . . there's soooo many great blogs out there, but here just a few. Check out these great blogs!!

Heather Eats Almond Butter
Sandi's Allergy-Free Recipes (Check out her blog! She has some creative recipes that are gluten & white sugar free)
The Gluten-Free Homemaker
Ginger Lemon Girl
Got Down Syndrome
Life on the Ranch
Good Goats


~ Hanunyah

Monday, November 21, 2011

Oat Flour Chocolate Cake

Oat flour chocolate cake with marshmallows and cranberries.

Oat flour has become our go-to flour (because there's not much rice flour left from the 50# bags). It's actually a pretty good flour (of course, be sure to use gluten-free oats if gluten-free). My sister, Suriyah, came across this chocolate cake recipe, using only oat flour, when searching for things to make with oat flour. If you have oats, you can make oat flour - just grind 'em up in a food processor, Vita-mix, blender, etc.

Oat flour chocolate cake with chocolate frosting.

This is an awesome recipe. The oat flour makes it very moist, it rises fairly well, and doesn't fall. So easy and versatile, too.

The recipe did use a teaspoon of cinnamon, but that is optional.  I typed up the basic recipe below.

Thanks, sis, for finding this great recipe!!


Oat Flour Chocolate Cake (Gluten, Dairy, Corn, Gum-free)
Adapted from Kitchen Therapy

3/4 cup oil
3/4 cup sugar
3/4 cup water or milk
6 tablespoons (1/3 cup + 1 tablespoon) cocoa powder
1 1/4 cups gluten-free oat flour
1 teaspoon baking soda
3 eggs
1 teaspoon cinnamon, optional

1. Preheat oven to 350 degrees F. Grease two 8-inch round baking pans, one 9x13-inch pan or a Bundt pan.

2. In a large bowl, combine all ingredients and beat until smooth. A whisk works well. Pour batter into prepared pans or pan.

3. Bake for about 30 minutes, or until a toothpick inserted in the center comes out clean. Cool and remove from pans. Frost, if desired.


~ Hanunyah


P.S. I plan to do some kind of Thanksgiving post sometime soon . . . maybe a menu or something. We'll see how busy the next few days are (hopefully I'll be able to bake a little more than the last few crazy days).


P.P.S. We won a Vita-Mix!!! For FREE! Crazy, I know. So, you'll probably see some Vita-Mix recipes soon. Yay!


Linked to Just Something I Whipped Up by The Girl Creative, Motivate Me Monday by Keeping it Simple, Gluten-free Wednesdays by The Gluten-free Homemaker and Tuesdays at the Table by All the Small Stuff

Wednesday, November 16, 2011

Rocky Road Bars


Marshmallows, chocolate and nuts. Homemade marshmallows, chocolate chips and nuts are combined in my version here - I searched, combined some recipe ideas and came up with my own version.


And when was the last time you saw desserts in the middle of the road? (it was easy here, because our country road is not very active). But that's what I like - being unique. Whether it's celery 'n' PB cake or me weirdly taking pictures in the middle of the road - it's not a bad thing to stand out from the rest.


If you ever find yourself with extra marshmallows (not very likely in most cases), then make these bars. Or, if you don't have extra marshmallows, make some and then make these. Or, if you want, you may go with the store-bought variety, if your body doesn't take offense to it.


Rocky Road Bars (Gluten, Dairy, Corn, Gum-free)
Adapted from Cookie Madness and AllRecipes.com

2/3 cup sugar
3 tablespoons lard
2 eggs
1 teaspoon vanilla (optional)
1/4 teaspoon baking soda
1/2 teaspoon salt
1/2 cup rice or other gluten-free flour
2 cups nuts, very finely chopped (I used walnuts and peanuts)
2 to 3 cups small marshmallows
1 1/2 cups safe chocolate chips
, divided


1. Preheat oven to 350 degree F. Line an 9x13 inch pan with foil (optional, but would be easier) and spray it with cooking spray or grease with oil.


2. In medium bowl, beat together sugar and lard. Add egg and vanilla and beat until smooth. Add soda and salt until well mixed, then gently stir in flour and 1 cup of the nuts. The batter will not be like cookie dough.


3. Spread in prepared pan. Bake for 15-20 minutes. Meanwhile, melt 1 cup of the chocolate chips. When the crust is done, remove from oven and let cool a few minutes. Spread a thin layer of the melted chocolate on the crust. Sprinkle the marshmallows, remaining chocolate chips and then nuts over chocolate layer. (See note).


4. Chill until set, then cut into pieces.


Notes:
Be sure to sprinkle the nuts on last. I sprinkled them on first, and it made it so that the marshmallows didn't stick very well.


~ Hanunyah


Linked to Gluten-Free Wednesdays by The Gluten-Free Homemaker, Making the World Cuter Monday by Making the World Cuter and Just Something I Whipped Up by The Girl Creative

Tuesday, November 15, 2011

Basic, Simple Marshmallows

Homemade mini marshmallows ready to dress up rocky road bars ;) (come back in a day or so!!).
When we learned about our allergies, we realized how simple things can be. These marshmallows are an example. Made with 3 main ingredients, they are much simpler and easier without the corn syrup and preservatives found in most (if not all) marshmallows found in the store.

Plain marshmallows with cranberry marshmallows in the background.
Most people are amazed that marshmallows are very easy to make and only require 3 ingredients (besides the dusting mixture to make them not too sticky).

Why don't you guess what 3 ingredients? I told a friend the other day.
Since marshmallows are white and fluffy, someone said egg whites. Some recipes do call for egg whites, but they are not needed.
Milk? No. Keep guessing.
Sugar? Of course (I know you can make marshmallows without sugar, but that's something else).
Water? Yes.
And gelatin. That one was hard for them to guess. It makes sense, though . . . marshmallows are like fluffy, white jell-o, kind of. That can be toasted over a campfire . . . for a sticky, goo-ey, sweet mess.


Now that's the marshmallow I'm talking about here. But they're better than the store-bought variety (taste-wise). One of my taste-testers (one of my sisters) said that they taste more "real" than store-bought - not fake, but good, homemade candy. Made with real sugar. Not that liquid that some now call "corn sugar".


Basic, Simple Marshmallows (Gluten, Dairy, Corn, Egg, Gum-free)
Adapted from Pumpkin Marshmallows

3 (.25 ounce) unflavored gelatin
2 1/2 cups sugar
1 cup cold water, divided
1/4 cup arrowroot powder
1/4 cup corn-free powdered sugar


1. Uniformly grease a 9x13 inch pan. Pour the 1/2 cup cold water into the bowl of a stand mixer and sprinkle the gelatin on top; set aside for 8 to 10 minutes.


2. Meanwhile, combine the sugar and water in a saucepan. Stirring constantly, bring to a boil over medium-high heat. Continue to cook, without stirring, until mixture reaches 250 degrees F on a candy thermometer, or until a small amount of syrup dropped into cold water forms a rigid ball.

3. Attach the mixing bowl to the stand mixer with the wire whip attachment and start the mixer on low speed. Carefully and slowly pour the boiling sugar syrup in a steady stream over the gelatin mixture. Increase the mixer to medium-high speed and mix until very thick, shiny, and white in color, about 5 to 12 minutes. When done, the mixture should form a more-or-less continuous ribbon off the spatula into the bowl. Scrape down the sides of the bowl occasionally using a rubber spatula.

4. Pour the mixture into the prepared pan in an even depth. Let the mixture set at room temperature for at least 8 hours or overnight.

5. Sift the cornstarch and confectioners' sugar into a pie plate or shallow bowl. When the marshmallows have set, turn them onto a work surface and cut them into squares or shapes as desired. You may make several cups worth of mini marshmallows for recipes, or bigger marshmallows for toasting, s'mores, make shapes matching the occasion, etc. Roll each marshmallow in the sugar mixture to coat all sides. Marshmallows are best served fresh, but they can be stored in an airtight container (unrefrigerated) for about a week or in the freezer for a month. If you store the marshmallows, re-roll them in the cocoa mixture before serving.


~ Hanunyah


Linked to Motivate Me Monday by Keeping it Simple, Made By You Mondays by Skip To My Lou, Shindig Saturday by Kims Kandy Kreations and Weekend Wrap-up by Tatertots and Jello

Thursday, November 10, 2011

White Chocolate Cranberry Muffins


Red, tart berries (aka cranberries) and white chocolate chips are often added to muffins. It is a great combo - tart cranberries and creamy chips. This is my version, the base muffin batter being the hidden, weird potato version I created of late.

I know these are not very good pictures, I was missing the sun (it was raining).

Cranberries and white chocolate chips may be added to your favorite basic muffin or cupcake recipe also. That way you wouldn't have to try a new recipe, if you're not feeling adventurous at the moment ;).

Anyway, these went very fast. I guess they were good! Although, I only used 1/2 cup of chips, and one of my sisters informed me that they really could use more. So I think 1 cup would be good. (Mom's added note - I don't like cranberries . . . too tart for this ole mouth!! :o )


White Chocolate Cranberry Muffins (Gluten-free, Dairy-free if safe chips are used)
Hanunyah Creation

2 cups baked potato, mashed
1/2 cup oil
2 eggs
1 cup sugar
1 teaspoon cinnamon
1 teaspoon vanilla
1 1/2 teaspoons each: baking soda, cream of tartar
1 tablespoon flaxseed meal
2 1/2 cups oat flour
1/4 cup water
1 cup fresh cranberries*
1 cup white chocolate chips

1. Preheat the oven to 350 degrees F. Grease muffin pans**.

2. Beat the potato, oil, eggs and sugar until creamy, making sure there are no potato chunks. Add the remaining ingredients and mix well.

3. Spoon into prepared muffin pans about 1/2 to 3/4 full. Bake in preheated oven for 18 to 20 minutes, or until medium-brown on the top or a toothpick inserted in the center comes out clean.

Notes:
*You may use dried cranberries.
**This recipe makes about 18 muffins.


~ Hanunyah

Wednesday, November 9, 2011

Oat Potato Vanilla Muffins

Potato starch (not flour - see here) is commonly used in gluten-free baking. It is great for smoothing out the grainy texture of other gluten-free flours (such as rice). 

Okay, so you have probably heard about potato starch. But what about baking with potato in a different form? Baked potatoes, anyone? Sure! (something we have A LOT of right now). Don't gross out - really. Think about it - potatoes are pretty bland (especially if you can dress 'em up with oats, vanilla and cinnamon). 

If you make these, tell me what you think. How could they improve? Have any ideas?

What a hit they were at the soccer field Sunday where we yelled "Portado! Portado!!". And those who don't know Spanish yell "Potato!!" ;). (Potato muffins? Oh, you mean something else ;).


I didn't get a picture of these muffins, but here is one of my favorite soccer pictures (my brother in the beginning of this year).

Since this recipe turned out great (as I used this same outline here), I may come up with some more interesting ideas. (cranberries? Hhhmmmmm). 

Oat Potato Vanilla Muffins (Gluten, Dairy, Corn-free)
Hanunyah Creation

2 cups mashed potato*
1/2 cup oil
2 eggs
1 cup sugar
1 teaspoon cinnamon
1 teaspoon vanilla
1 1/2 teaspoons each: baking soda, cream of tartar
1 tablespoon flaxseed meal
2 1/2 cups oat flour
1/4 cup water

1. Preheat the oven to 350 degrees F. Grease muffin pans**.

2. Beat the potato, oil, eggs and sugar until creamy, making sure there are no potato chunks. Add the remaining ingredients and mix well.


3. Spoon into prepared muffin pans about 1/2 to 3/4 full. Bake in preheated oven for 18 to 20 minutes, or until medium-brown on the top or a toothpick inserted in the center comes out clean.

Notes:
*You can use left-over mashed potatoes or mashed-up baked potatoes.
**This recipe makes about 18 muffins.


~ Hanunyah

P.S. Check out my other blog for drawings I've done pictures around the ranch and soccer!!

Linked Parties:
Gluten-Free Wednesdays @ The Gluten-Free Homemaker
Food on Friday @ Carole's Chatter

Thursday, November 3, 2011

French Toast


Nothing is hard about french toast, really, as long as you have the bread making down (although we did think about making it with pancakes - that wouldn't be traditional french toast, but, hey, maybe we'd start a new tradition ;) ).


Ducks and french toast, resting in the morning sunshine.

For an easy bread recipe, go here to my quick bread recipe, or use your favorite gluten-free bread. For a quick and easy breakfast treat, try making several loaves of bread in one day, freeze it, then pull out a loaf the night before.

Funny picture . . . the cat wanted some ;).
So, onto the sweet goodie of the day. . . . 

French Toast (Gluten, Dairy, Corn-free)

4 eggs
1 cup milk*
cinnamon (optional)
about 1/2 a loaf allergen-free bread
lard or other cooking fat
powdered sugar or maple syrup**

1. Whisk together the eggs, milk and cinnamon. Dip the bread in the mixture, letting soak for several seconds, depending on how moist the bread is.

2. Melt the cooking fat on a griddle. Cook until golden brown on each side, flipping once.

Notes:
*You may use non-dairy milk, I used goat milk.
**This is corn-free as long as you use corn-free powdered sugar and/or syrup.


One more duck picture ;).


~ Hanunyah

Tuesday, November 1, 2011

Cinnamon Custard

I snuck outside before it was devoured . . . 

Last month was busy, both on the blog and ranch, but here is November. Welcome this new month with a sweet, rich custard. Warm cinnamon and the sweetness of vanilla travels throughout this easy custard with a interesting, chewy "crust". The sugar caramelizes, so be sure to soak the pan before washing.


This was a hit here (especially with my brother who probably would have eaten the whole thing).

Cinnamon Custard (Gluten, Dairy and Corn-free)
Adapted from AllRecipes.com

Crust (optional):
3 tablespoons sugar
4 tablespoons oat or other gluten-free flour
1/2 teaspoon cinnamon
2 tablespoons oil

Custard:
1 cup sugar
2 tablespoons oat or other gluten-free flour
1 teaspoon cinnamon
1 egg
2 tablespoons oil
1 teaspoon vanilla
1 1/2 cups milk

1. Preheat oven to 400 degrees F (205 degrees C). In a 8 inch baking dish combine all of the crust ingredients. Press down into the pan.

2. In a large bowl, combine the sugar, flour and cinnamon. Add the beaten egg, oil, and vanilla. Mix well and add the milk. Pour over the crust mixture.

3. Bake at 400 degrees F for 15 minutes. Reduce heat to 350 degrees F and bake for about 25 minutes more.

Fall lamb
and don't forget the kids ;).


~ Hanunyah

new design + name

As of 1-3-12: I've re-named my blog name (which used to be "Hanunyah's Sweet Creations") to "Ranch Girl's Sweets 'N' Treats". "Sweet Creations" is a pretty common name, so I figured I'd change it to something a little different ;). My URL is still the same, though.

Also, a big thanks goes to my older sister (@ CountryGirlWebDesign.com) who has re-designed my blog and fixed-up all of the HTML. So, I hope you enjoy the new layout!