Showing posts with label candy. Show all posts

Wednesday, February 27, 2013

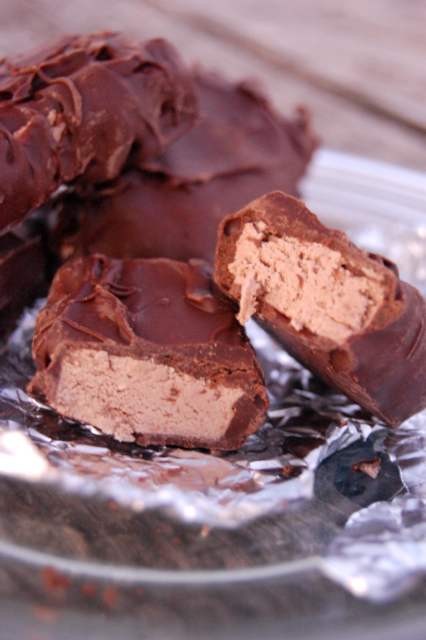
Homemade Butterfinger Candy Bars

A coule months ago or so I was working on making my own recipe for butterfingers. I made up an idea and tried it - melting sugar, adding peanut butter and baking soda. I tried it and it worked . . . mostly. They were too hard. I made them making slight variations. It wasn't perfect, and I sort of forgot about it. I did use the hard butterfinger-flavored candy in a cheesecake . . . that was very good, and I repeated that even thought the candy wasn't just right.

My little sister (who just turned 8) has been in the kitchen a lot lately. She makes donuts, almost completely by herself! Yesterday she wanted to make hard candy, but we couldn't make the one we usually make because we were out of corn syrup and cream of tartar (it would crystalize without one of those). But, I remembered that the butterfingers didn't need one of those. So, I added some sugar to a pot and told her to stir it. I stirred, and gathered the other ingredients. As a somewhat last-minute decision, I decided to add another 1/2 cup of peanut butter because I remembered that they were too hard last I made them. After pouring into the pan and washing the pot, I went to score them and ta-da! I think it worked! Once they were completely cooled, I realized it was a success. They were almost just right, but I think they needed to tad more crunchy. So, I think 1 1/3 cups peanut butter would be perfect, not 1 cup and not 1 1/2 cups.

A quick note . . . I've never got to dipping these every time I've made them ;).

Homemade Butterfinger Candy Bars
Hanunyah Creation
gluten-free, dairy-free, corn-free

2 cups sugar, white or brown
1 1/3 cups peanut butter
1 1/2 teaspoons vanilla
1 teaspoon baking soda

In a medium-size pot over medium to medium-high heat, add the 2 cups sugar. Stirring constantly, melt the sugar with NO water, only sugar in the pot. First it becomes clumps, then the clumps melt. Stir until there are no chunks left. Even if you use white sugar, the sugar should be a dark golden color at this point. Remove from heat immediately.

Add the peanut butter, vanilla and baking soda and quickly stir to combine. Pour into the prepared pan.

After a few minutes (when it's not really hot but it's not cool) deeply score into bars - big or small depending on your preference. Cool completely, break apart and dip in melted chocolate (if they make it to that point, that is ;) ).


Sorry I don't have a picture of these to share . . . I plan on making (and dipping) them to take pictures sometime soon. Right now we're out of chocolate chips, though.

~ Hanunyah

Link Parties:
Gluten-free Wednesdays @ The Gluten-Free Homemaker

Monday, November 26, 2012

Amazing Sugar Cookies


Sugar cookies! Delicious cookies, fun to decorate! Sugar cookies can be made for a party anytime of the year, since they can be frosted and decorated in many ways.

These (gluten-free) cookies that my sister, Suriyah, makes are a roll-out cookie - that way the surface is flat and easy to frost and decorate. The dough is nice, a pleasure to work with and they stay together well.

Need a little extra somethin' to spice up your party? These are perfect!

Amazing Sugar Cookies
Adapted from 
(Gluten-free, Dairy-free, can be made Corn-free*)

1 cup lard
1 cup sugar
1 egg
1 teaspoon vanilla
2 teaspoons baking powder*
2 3/4 cups gluten-free flour (we use fine rice flour)

Cream fat & sugar. Add egg and vanilla. In a separate bowl, mix the dry ingredients. Add to the sugar mixture. Roll out to about 1/4 inch thickness and cut either with cookie cutters into shapes or use a canning jar band (large or small, whatever size you want). Bake at 350 for 7 to 10 minutes.

Notes:
*To make this corn-free, substitute 1 teaspoon baking soda + 1 teaspoon cream of tartar in place of the baking powder.

I hope you had a good Thanksgiving! I did with my family. Today? We're having another party very soon! Friends are coming home, a friend's birthday is today and a 2nd Thanksgiving.

"I will praise the name of God with a song, And will magnify Him with thanksgiving." Ps. 69:30
"giving thanks always for all things to God the Father in the name of our Lord Jesus Christ," Eph. 5:20

~ Hanunyah

Link Parties:
Gluten-Free Wednesdays @ The Gluten-Free Homemaker
Allergy-Free Wednesdays @ The Tasty Alternative
Gluten-Free Fridays @ Vegetarian Mama

Monday, October 8, 2012

31 for 21: Jalepeno Peanut Brittle

Sweet. Salty. Spicy. Crunchy. Interesting.

A nice treat for those who like spicy stuff, this easy brittle (for a mid-experienced candy maker) is a favorite of my mom's. Jalapenos (or other hot peppers) lend a hot color and flavor touch to a brittle that didn't forget the peanuts.

Jalapeno Peanut Brittle (Gluten, Dairy, Corn-free)
Adapted from CDKitchen.com

1 tablespoon lard (or butter)
1/3 cup jalepenos, seeded and very finely chopped
1/2 cup roasted salted peanuts*
1 1/4 cups sugar
1/4 cup corn syrup

1/4 teaspoon vanilla extract
1/4 teaspoon almond extract
1/2 teaspoon baking soda

1. In a skillet melt 1 tablespoon of the lard. Add jalapenos, and cook over low heat until peppers are soft. Set aside.

2. In a saucepan, combine sugar and syrup. Stirring, bring to a boil over medium heat. Add jalapenos and peanuts. Stir well, and cook until mixture reaches the soft crack stage on a candy thermometer. Remove from heat.

3. Blend in vanilla extract and almond extract. Sprinkle baking soda evenly over the cooked mixture and stir well. When foamy, pour immediately onto a cookie sheet. Let cool until the brittle is cool enough to handle. Break into pieces. Store in an airtight container.

Notes:
*If using raw peanuts, cook with the jalapenos and proceed to set aside.
You may add food coloring with the extracts, if desired.

One of the llamas here at Liberty Ranch. It's good to close with a picture :).

~ Hanunyah

31 for 21 is a blog challenge to raise Down Syndrome awareness 1 blog at a time. The challenge is to blog everyday the whole month of October (31 days) to raise awareness for Down Syndrome (aka Trisomy 21). This is the 6th Annual 31 for 21 Challenge.

Tuesday, September 11, 2012

Honey Peanut Brittle (Refined Sugar-free,Corn-free), Recap of last month

My newest baby . . . this time it's a heifer (girl) calf,
so she'll probably be around for longer than the bull calves we've had :).

Wow. A whole lot has happened in the last month. It went by fast, but at the same time it seemed like awhile. Did that make sense? :).

On the florida beach.
Last month my 4 oldest siblings and my dad ("Abba"), along with some friends and family went to Florida for the Republican National Convention. Since I'm not going into that right now on this blog, you can read their stories on their blogs, if you want, here and here. They were gone awhile, about 2 weeks, and the rest of us stayed to hold down the fort.

A young nubian buck.
It's breeding season right now in goat land, so we're making for a crazy January/February for ourselves next year . . . we have 1 to 3 does due almost everyday for 2 weeks. We better stock up on sleep, 'cause when kids (baby goats) are born, we make them bottle babies, and feed them every 4 to 6 hours for the first day or so.

Speaking of babies . . . that donkey is sure looking big and low. My sister and I were observing her this morning. Baby donkeys are so cute! Just wait a few days . . .

Running a ranch involves work, but it is exciting, educational and fun at the same time.

A guinea chick in the refreshed grass (we got some rain!).
Well, onto the peanut brittle. My big brother is the one who is grain and sugar-free, he is on the GAPS diet - but a little modified. Second-youngest bro is a "filth-bomber", if we let him. (Don't know what a "filth-bomber" is? Well, someone who will eat tons of gluten or "junk" food. It's a saying around this house  - "oh, so-and-so is filth-bombin' it today".)

Big bro doesn't get treats very often. He doesn't demand anything of me. It kinda goes like this:

Brother: "oooohhh . . . can I eat that?"
Me: "No. Do you want me to make you something?"
Him: "That's okay, you don't have to"
Me: "You want peanut butter cookies or peanut brittle?"
Him: "Oh, anything, I don't care"

So, I had honey, peanuts and peanut butter. I decided to make peanut brittle (that used to be one of his favs).

I measured some honey, added some sea salt and peanuts, brought it to a boil. I cold-water tested, while trying to keep it from overflowing out of the pot, just barely too small. Added some home-slaughtered, home-rendered lard in there somewhere. I took it from heat, added baking soda. I stirred, watching it foam up, while pouring onto the cookie sheet.

That's how my candy adventures have gone the last few times. A cup of this, some of that, using what I've learned have from experiments and reading recipes.  That was very similar to how I made up a recipe for "Butterfingers" recently.

But, for the sake of measurements and clarity . . .

Honey Peanut Brittle (Refined Sugar-free, Corn-free, Soy-free, Dairy-free, Grain-free, etc.)
Created by Hanunyah Fish

1 cup honey
sea salt (optional)
1 cup raw or roasted peanuts*
2 tablespoons lard
1 teaspoon baking soda

1. Bring the honey and salt, if desired, to a boil over medium-hight heat. If using raw peanuts, add them here.

2. Continue to cook, on medium heat, stirring occasionally, until it reaches the hard crack stage, 300 degrees F. (I recommend using a candy thermometer).

3. Remove from heat. If using roasted peanuts, add them here. Add the lard and baking soda, and quickly stir to combine. Pour onto a cookie sheet and let cool.

Notes:
*If using raw peanuts, add them when the honey comes to a boil. If using roasted peanuts, add them at the end with the lard. Also, if using roasted peanuts, be sure to check the label - some of them have corn and other additives.
Some homemade vanilla would be a wonderful addition (add it at the end with the lard).

Oh! and I did not get a picture of these. . . sorry.

~ Hanunyah

Linked to:
Take-A-Look Tuesday
@ Sugar Bee Crafts


Unwasted Homemaking
@ Don't Waste your Homemaking
Friday Favorites @ Simply Sweet Home  

Wednesday, June 13, 2012

Checkin' In

Just checkin' in. It's JUNE! My oldest brother turned 20 years old a few days ago, on the 10th. We didn't do anything out of the norm, and I didn't even make a cake - which is understandable, since he's on that GAPS thing ;). I might make him some cookies or something, though. Or peanut brittle? Honey cooked to 300 degrees, add baking soda, peanuts and a little coconut oil? Perhaps.

The soccer league finals is this weekend. Our team - the one my dad, brothers and nephews play on - made it to the finals this time.

A few pictures, until I have to go milk the goats (35), bottle (cows and goats), etc. etc.

A simple lime cake.

A twin ewe lamb, one of the 3 recently born.

Our small garden.

Our big, fat donkey who is due in 4 months or so.

One of the surviving bottle calves (3 died). The funny thing is he was the smallest and the skinniest.

Buddy, an alpaca that we had when he was little, then sold, then re-bought.


~ Hanunyah

Thursday, January 19, 2012

Cookbook Testing, Sugar Science

Lots of boiling sugar . . . really, I just have to make the recipes my family likes a few more times than I already do - the more I make a recipe, the more it is tested.

When I tripled my basic marshmallow recipe the other day, I think I'd need a industrial mixer for it to hold all of the fluffy-ness. Yes, it nearly over-flowed our KitchenAid (which is big), but I did not get a picture of that.

Boiling sugar, candy making, is very interesting. So many things to learn it seems like, you just have to get down to the science of it - which is fun, and brings many sweet things to my family ;). Bring sugar to a certain temperature, it makes divinity, another temperature nougat, another temperature marshmallows, the list goes on. So, does that mean I can count candy making in my school as science? That's how homeschooling is so practical.


~ Hanunyah

Thursday, January 5, 2012

"3 Musketeers" - sneak preview


So, would you like to have "sneak previews" to my cookbook? Well, I am writing the cookbook. I'm hoping to have several candy bar recipes in there. For now, if you want a little candy bar fun, you may see my recipe for Coconut Candy Bars. And don't worry - I'll still post recipes for you, Lord willing.


Homemade candy bars. Chewy nougat covered in chocolate. Like 3 Musketeers candy bars - only much simpler and better-tasting. These are really rich. Easy to make. No corn-syrup, of course (because it's easier without). The recipe makes . . . 32 candy bars (gasp!) that are roughly 1 inch by 2 inches I'd say.
      If you're on any kind of a diet, you're probably glad I'm not passing out the recipe right now. But surely my family is not on a diet (besides the gluten-free lifestyle). Because there's no reason to go on a diet. This time of the year is the same to us as any other time.


~ Hanunyah

Monday, December 19, 2011

Quiet

No recipe for you today, but I'm hoping to get my blog design finished soon. While my blog rests, I hope you enjoy the winter days and maybe make some chocolate fudge and marshmallows (hey, hot cocoa on a stick? ;) ).


~ Hanunyah

Thursday, December 15, 2011

Chocolate Fudge


The Gluten-Free Homemaker's monthly theme for December is chocolate, in particular chocolate fudge. So, to fit the theme, I remembered this recipe. I pulled it from deep in the archives, and made my little brother some chocolate fudge.

In the new goat milking barn!

But this time, this five-ingredient fudge is made with water instead of milk - perfect for anyone with a dairy allergy, or for us since the goats' milk drops in quanity in the winter. It's sooo simple and perfect. Silky Smooth. Rich and Chocolat-ey. Easy at the drop of a . . . thermometer. Or not. You don't need a thermometer. Just boil it five minutes at medium heat. If you want to be sure, drop some boiling sugar into super-cold water - if it easily forms a ball while in the cold water, but flattens once removed - you're done . . . or at least until your arm gets a good workout (don't feel like beating fudge? Oh, I'm sorry. Maybe you have a hand mixer? That'll do you a wonder).

Oh, yeah. Fresh-from-the-udder rich 'n' creamy goat milk with chocolate fudge? No problem for my mama!

So, you ready? Not too hard, right? If this recipe is like me speaking chinese to you, then you may e-mail me at h2 (at) gotdownsyndrome (dot) net for help.

Chocolate Fudge (Gluten-free, Dairy-free, Corn-free)
Adapted from Cocoa Fudge

2 cups sugar
1 cup water*
1/2 cup cocoa
1/4 cup lard
1 teaspoon vanilla (optional)


1. Combine the water, sugar and cocoa in a large saucepan (it boils up very high, so at least 4-quart. You don't want a sticky mess all over the stove like I had - so play it safe). Mix well. Bring to a boil over high heat; then lower the temperature to medium. Cook until it reaches soft ball stage (235 to 245 degrees). (I use a candy thermometer, or you could use the cold water test. Don't be scared - it's really not that hard. It takes about five minutes to reach the soft ball stage).


2. Remove from heat and add the lard and vanilla. Do not stir, and allow to cool for about 10 minutes or so. Beat (by hand or with a mixer) until very thick and the mixture begins loose it's shine. Quickly pour into a greased 8x8 inch pan. Let chill in the refrigerator until set.


Notes:
*I used to use goat milk, but today I tried it with water - awesome! My sister was surprised to hear I used water instead of milk.


~ Hanunyah


Linked to Gluten-Free Wednesdays by The Gluten-Free Homemaker

Tuesday, November 15, 2011

Basic, Simple Marshmallows

Homemade mini marshmallows ready to dress up rocky road bars ;) (come back in a day or so!!).
When we learned about our allergies, we realized how simple things can be. These marshmallows are an example. Made with 3 main ingredients, they are much simpler and easier without the corn syrup and preservatives found in most (if not all) marshmallows found in the store.

Plain marshmallows with cranberry marshmallows in the background.
Most people are amazed that marshmallows are very easy to make and only require 3 ingredients (besides the dusting mixture to make them not too sticky).

Why don't you guess what 3 ingredients? I told a friend the other day.
Since marshmallows are white and fluffy, someone said egg whites. Some recipes do call for egg whites, but they are not needed.
Milk? No. Keep guessing.
Sugar? Of course (I know you can make marshmallows without sugar, but that's something else).
Water? Yes.
And gelatin. That one was hard for them to guess. It makes sense, though . . . marshmallows are like fluffy, white jell-o, kind of. That can be toasted over a campfire . . . for a sticky, goo-ey, sweet mess.


Now that's the marshmallow I'm talking about here. But they're better than the store-bought variety (taste-wise). One of my taste-testers (one of my sisters) said that they taste more "real" than store-bought - not fake, but good, homemade candy. Made with real sugar. Not that liquid that some now call "corn sugar".


Basic, Simple Marshmallows (Gluten, Dairy, Corn, Egg, Gum-free)
Adapted from Pumpkin Marshmallows

3 (.25 ounce) unflavored gelatin
2 1/2 cups sugar
1 cup cold water, divided
1/4 cup arrowroot powder
1/4 cup corn-free powdered sugar


1. Uniformly grease a 9x13 inch pan. Pour the 1/2 cup cold water into the bowl of a stand mixer and sprinkle the gelatin on top; set aside for 8 to 10 minutes.


2. Meanwhile, combine the sugar and water in a saucepan. Stirring constantly, bring to a boil over medium-high heat. Continue to cook, without stirring, until mixture reaches 250 degrees F on a candy thermometer, or until a small amount of syrup dropped into cold water forms a rigid ball.

3. Attach the mixing bowl to the stand mixer with the wire whip attachment and start the mixer on low speed. Carefully and slowly pour the boiling sugar syrup in a steady stream over the gelatin mixture. Increase the mixer to medium-high speed and mix until very thick, shiny, and white in color, about 5 to 12 minutes. When done, the mixture should form a more-or-less continuous ribbon off the spatula into the bowl. Scrape down the sides of the bowl occasionally using a rubber spatula.

4. Pour the mixture into the prepared pan in an even depth. Let the mixture set at room temperature for at least 8 hours or overnight.

5. Sift the cornstarch and confectioners' sugar into a pie plate or shallow bowl. When the marshmallows have set, turn them onto a work surface and cut them into squares or shapes as desired. You may make several cups worth of mini marshmallows for recipes, or bigger marshmallows for toasting, s'mores, make shapes matching the occasion, etc. Roll each marshmallow in the sugar mixture to coat all sides. Marshmallows are best served fresh, but they can be stored in an airtight container (unrefrigerated) for about a week or in the freezer for a month. If you store the marshmallows, re-roll them in the cocoa mixture before serving.


~ Hanunyah


Linked to Motivate Me Monday by Keeping it Simple, Made By You Mondays by Skip To My Lou, Shindig Saturday by Kims Kandy Kreations and Weekend Wrap-up by Tatertots and Jello

Thursday, October 27, 2011

31 for 21: Pumpkin Marshmallows

I thought the mossy pile of wood just fit the jars of these rustic marshmallows . . . .


Pumpkin everything!

This recipe, too, was in my "to try" pile for too long, when I made it today. You may think marshmallows are complicated and hard to make, but no. Once you make them once, you realize it's not hard and you get the hang of it.


Here is what is good about these marshmallows:

  • They are free of corn syrup, cream of tartar (because we are out, and I thought "how could marshmallows crystallize?"), eggs (no beating egg whites!), gums, dairy, nuts, and of course, gluten.
  • Easy to make.
  • Taste great! Light and fluffy.


Pumpkin Marshmallows (Gluten, Dairy, Corn, Egg-free)
Adapted from AllRecipes.com

1/2 cup water, cold
3 (.25 ounce) unflavored gelatin

2 1/2 cups white sugar
1/2 cup water

1/2 cup pumpkin puree
1 teaspoon cinnamon
3/4 teaspoon nutmeg
1/2 teaspoon ginger
1/4 teaspoon allspice
orange food coloring (optional)

1/4 cup cocoa powder*
1/4 cup arrowroot powder
1/4 cup corn-free powdered sugar*


1. Uniformly grease a 9x13 inch pan. Combine the pumpkin puree, cinnamon, ginger, nutmeg, and allspice. Set aside.

2. Pour the 1/2 cup cold water into the bowl of a stand mixer and sprinkle the gelatin on top; set aside for 8 to 10 minutes. Meanwhile, combine the sugar and water in a saucepan. Stirring constantly, bring to a boil over medium-high heat. Continue to cook, without stirring, until mixture reaches 250 degrees F on a candy thermometer, or until a small amount of syrup dropped into cold water forms a rigid ball.

3. Attach the mixing bowl to the stand mixer with the wire whip attachment and start the mixer on low speed. Carefully and slowly pour the boiling sugar syrup in a steady stream over the gelatin mixture. Increase the mixer to medium-high speed and mix until stiff, shiny, and white in color, about 5 to 12 minutes. Scrape down the sides of the bowl occasionally using a rubber spatula.

4. With the mixture on low speed, fold in the pumpkin mixture until combined. Add food coloring, if desired. Turn up the speed to medium-high and beat about 3 minutes longer. When done, the mixture should form a more-or-less continuous ribbon off the spatula into the bowl.

4. Pour the mixture into the prepared pan in an even depth. Let the mixture set at room temperature for at least 8 hours or overnight.

5. Sift the cocoa powder, cornstarch, and confectioners' sugar into a pie plate. When the marshmallows have set, turn them onto a work surface and cut them into squares or shapes as desired. Roll each marshmallow in the cocoa mixture to coat all sides (reserve the cocoa mixture for re-dredging if needed). Marshmallows are best served fresh, but they can be stored in an airtight container (unrefrigerated) for about a week or in the freezer for a month. If you store the marshmallows, re-roll them in the cocoa mixture before serving.


Notes:
*The cocoa is optional if you use the powdered sugar. I did half of mine in the cocoa, sugar and starch mixture, and half in the starch/sugar mixture. They both turned out great, it just depends on what you like - some people like the little extra flavor touch the cocoa gives, while others don't like the darkness of the cocoa.


~ Hanunyah


Linked to Gluten-Free Wednesdays (by The Gluten-Free Homemaker) and Tasty Tuesdays (by Beauty and Bedlam)


Monday, September 26, 2011

Divinity

Since I made divinity last time (first time I made divinity) my sister said she likes it and wants me to make it again. So I just finished making it today - and it was a hit just like last time (but it is a different flavor this time).


Divinity (Gluten-free, Dairy-free, Corn-free)
Adapted from FoodNetwork.com


2 1/2 cups sugar, divided*
3/4 cups water, divided
1/4 teaspoon cream of tartar
2 egg whites
1 teaspoon vanilla extract (optional)
1. In a large saucepan over medium heat, bring 1/4 cup water to a boil. Add 1/2 cup sugar and stir until dissolved. Add the remaining sugar, water and the cream of tartar. Bring to a boil over medium-high heat. Continue to boil, undisturbed, until the mixture reaches the hard ball stage, 265 degrees F on a candy thermometer. Remove from the heat.

2. In a standing electric mixer, whip the egg whites until stiff peaks form. Working very slowly, add the sugar syrup in a thin, steady stream, and continue beating on high speed until the candy begins to lose its shine - this can take as long as 10 or 15 minutes, depending on your mixer. (When adding the hot sugar syrup to the egg whites, make sure to stop occasionally to scrape down the bowl if any syrup has collected on the sides. When the beaters are lifted out of the candy mixture, it should fall in a smooth thick ribbon that mounds on itself.

3. Working quickly, fold in the vanilla if desired, and drop by tablespoonfuls onto waxed paper. Cool completely before serving. The candies should firm up as they cool. Store in an airtight container.

Notes:
*I used brown sugar because we don't have any vanilla - they said it tasted like caramel.

This is best made on a low-humidity day or in a dry location; damp conditions will prevent divinity from firming up.


~ Hanunyah

Friday, August 5, 2011

Caramel Sauce

You may have noticed that my last couple recipes have a brown sugar sauce in them. It is very quick, simple and easy, and would be great as a dip for apples, or maybe even over ice-cream.

Caramel Sauce (Gluten-free, Dairy-free, Corn-free)
Hanunyah Creation

1 cup brown sugar
1/4 cup goat milk
1/4 cup lard

Bring sugar and milk to a boil over medium-hight heat. Boil for 1 minute. Remove from heat and add lard. Let cool for a couple of minutes, then beat until thick. Store in the refrigerator, and warm up when ready to serve.


~ Hanunyah

Saturday, March 26, 2011

Jell-o Fudge

This was good! Use any flavor you want. The recipe used Kool-Aid, but we didn't have any so I used jell-o and less sugar.

Jell-o Fudge


1 3 oz. package Jell-o (any flavor)
1 3/4 cups sugar
1/2 cups butter
2/3 cups milk

1.In saucepan mix and bring all ingredients to a boil.
2.Cook and stir untill mixture forms a soft ball in cold water.
3.Remove from heat beat until thick.
4.Spread in greased pan, cool and cut in about 18 pieces.

~ Hanunyah

Friday, February 18, 2011

Candied Orange Peels

Ummmmm . . . . . I've been a slacker at posting here!! Sorry!

No reason for orange (or lemon or grapefruit) peels to go to waste! These are pretty good, and aren't bitter if you boil them 3 times.

Candied Citrus Peel
Adapted from http://www.homemade-dessert-recipes.com/

Carefully cut orange peel in strips, place in saucepan in cold water, and bring to boil. Repeat process three times, then measure orange peel and add equal quantity of sugar and hot water. Cook until pulp is translucent. Remove from syrup; roll in sugar; place on plates to dry.


~ Hanunyah

Saturday, February 5, 2011

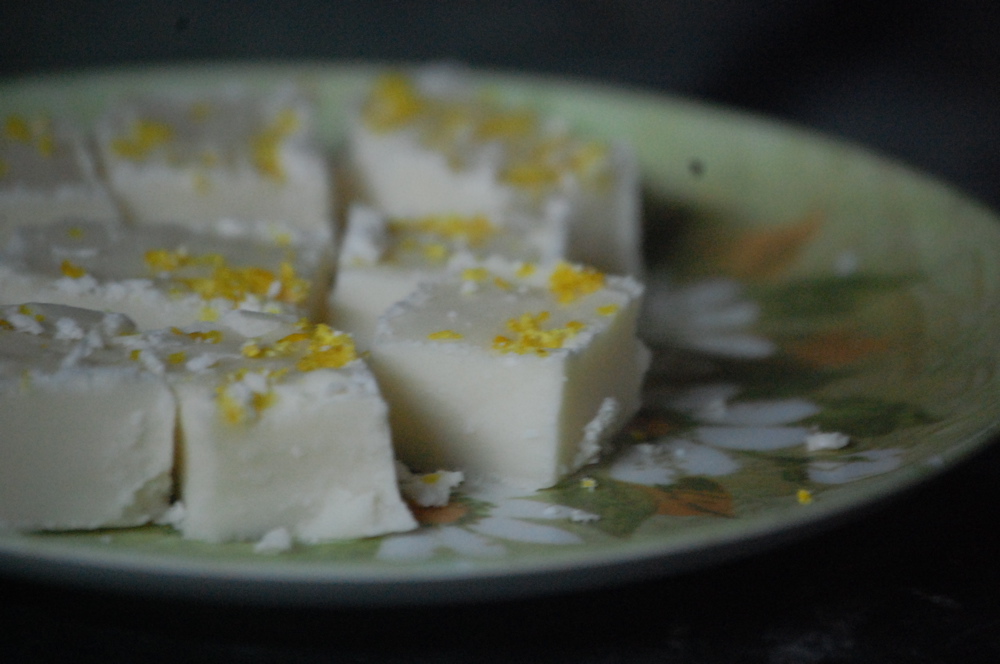
Oranges 'N' Cream Fudge


This is THE BEST fudge I have tasted!! It was sooo yummy, creamy, and dreamy. This is definately a hit - I was told it tasted like a Dreamsicle.

I created this recipe from a different fudge recipe - Peppermint Chocolate Fudge. I had the idea to use white chocolate or white almond bark instead of chocolate chips, and use some orange extract that I had on hand instead of peppermint extract. So I tried it, and as said earlier the results were great!

Oranges 'N' Cream Fudge


  • 1 2/3 cups granulated sugar
  • 2/3 cup milk
  • 2 Tbs. margarine (or lard, shortening, etc.)
  • ¼ tsp. salt
  • 2 cups mini marshmallows
  • 1 ½ cups (9 ounces) white almond bark, chopped (or white chocolate chips)
  • 1 ½ tsp. vanilla extract
  • 1 1/2 tsp. orange extract
  • graded orange peel (optional)


  • Line a 8-inch square baking pan with foil.
  • In a medium saucepan combine sugar, milk, margarine, and salt. Bring to a full boil over medium heat, stirring constantly. Boil, stirring constantly, for 4 to 5 minutes (until soft ball stage). Remove from heat. Stir in marshmallows, almond bark, vanilla extract, and orange extract. Stir vigorously for 1 minute or until marshmallows are melted. Pour into prepared baking pan; cool for 1 minute. Top with the orange peel, pressing in slightly. Refrigerate for 2 hours or until firm. Lift from pan; remove foil. Cut into 48 pieces.


~ Hanunyah

Friday, January 7, 2011

Colorful & Flavorful Hard Candy Mix

Spend a hour or two and make a big plate of different colors and flavors of hard candy, and mix them together to snack on, or take to a party.

The colors in this mix are: Pumpkin Pie Spice, Hot Cinnamon, Lemon, and Chocolate.


new design + name

As of 1-3-12: I've re-named my blog name (which used to be "Hanunyah's Sweet Creations") to "Ranch Girl's Sweets 'N' Treats". "Sweet Creations" is a pretty common name, so I figured I'd change it to something a little different ;). My URL is still the same, though.

Also, a big thanks goes to my older sister (@ CountryGirlWebDesign.com) who has re-designed my blog and fixed-up all of the HTML. So, I hope you enjoy the new layout!