Showing posts with label almond. Show all posts

Tuesday, January 15, 2013

Banana "Ice-cream" with Toasted Coconut and Almonds

 A breakfast creation of mine that my father has asked for a couple times now :). Very healthy and yummy. The nutritional quail eggs add a delightfully rich flavor to the creamy, frozen bananas combined with the flavor of toasted coconut and the crunch of almonds.


Banana "Ice-cream" with Toasted Coconut and Almonds


Hanunyah Creation
gluten-free, dairy-free, grain-free, sugar-free, starch-free, corn-free, soy-free

Simply blend up 4 quail eggs and 2 bananas in a high-speed blender (Vita-Mix). Place a few tablespoons of flaked coconut and a small handful of raw almonds on a plate and microwave for about 30 seconds*. Top the banana mixture with the almonds and toasted coconut.

Notes:
*You may toast the coconut in the oven instead, if desired. 

~ Hanunyah

Food on Friday @ Carole's Chatter

Wednesday, October 3, 2012

31 for 21: Fruit & Nut Granola Bars


Being so versatile, granola bars are very allergy friendly. These are even GAPS approved.

Homemade crunchy, chewy and slightly sweet granola bars - easy, versatile, healthy and portable. Here's a no-bake recipe I created.

Fruit and Nut Granola Bars
Hanunyah Creation
(Gluten-free, Dairy-free, Refined Sugar-free, Grain-free, Corn-free)

3/4 cup honey
1/2 cup natural peanut butter, optional
1 teaspoon cinnamon
3 cups nuts and seeds
1 cup raisins

1. In a medium sized saucepan, bring the honey to a boil and boil for 1 minute.

2. Remove from heat. Add the peanut butter, cinnamon, nuts and raisins and mix well.

3. Spread into a greased 6x11 inch pan. Cool and cut into 16 bars.

Notes:
This granola bar recipe is very versatile.
- You can use any mixture of nuts (chopped or whole) and/or seeds, and any mixture of raisins and/or dried fruit. (Remember to check ingredient labels, because some dried fruits have added ingredients). You could play around with adding different spices and extracts, and even other syrups instead of honey.
I recommend wrapping these individually, as they kinda stick together otherwise.


~ Hanunyah

31 for 21 is a blog challenge to raise Down Syndrome awareness 1 blog at a time. The challenge is to blog everyday the whole month of October (31 days) to raise awareness for Down Syndrome (aka Trisomy 21). This is the 6th Annual 31 for 31 Challenge.

Link Parties:
Gluten-Free Wednesdays @ The Gluten-Free Homemaker
Wheat-Free Wednesday @ Anne-Marie Cain
Allergy-Free Wednesdays @ The Tasty Alternative and 6 other blogs
Gluten-free Fridays @ Vegetarian Mama and 2 other blogs

Tuesday, February 21, 2012

The BEST Fluffy GAPS Pancakes (so far)

Jenny, a (goat) kid.
Yet another grain-free recipe. It's good though, since my grain-free followers have been a bit neglected of recipes from me lately. But, nobody would know if I didn't say - I don't eat but only a couple of the recipes I've made and posted here. That's why I took the blog name "Starvin' Chef". (My family suggested that name. They were making jokes that I'd shrivel away without them ;) ). Don't feel compelled to click on that link. Let me tell you - that blog is not very pretty right now. It's a Starvin' Blog as far as beauty goes. It just needs a little work when I get to it. Ok, ok . . .

Now this is what, the fourth GAPS pancake recipe on this blog? But it's the best so far. Not to mention the easiest, too.

Nice and fluffy, lightly sweet pancakes with a touch of cinnamon - yum! These do not require a whole lot of almond flour, therefore are not dense, and are healthy with so many eggs.

So, to my GAPS visitors ~ enjoy some healthy sweetness today with this quick and easy recipe!

This recipe is "Starvin' Chef" approved ;).

Fluffy and Sweet Pancakes (GAPS, Grain, Sugar, Soy, Dairy, etc. Free)

5 eggs
1/4 cup honey
1 1/2 cups almond meal/flour, approximately
1/2 teaspoon salt
1/4 teaspoon baking soda*

Whisk all ingredients together well, adding flour as needed. Cook on a pan or griddle with some coconut oil, flipping pancake to cook through.**

Notes:
*Since baking soda, on the GAPS diet, is not supposed to be used in excessive amounts, I'm sure you could omit it and be just fine.
**We usually make small pancakes (probably about 3 inches across), but if you make them bigger you may have more flipping problems.


~ Hanunyah

Monday, February 20, 2012

Chocolate Chunk Cookies, GRAIN & SUGAR FREE

Oops! I sort of forgot about the Chocolate Chunk Cookies I mentioned in one of my last posts . . . sorry ;). I'm still here, we've been busy with kidding/lambing season here.

Well, when people think of chocolate it is usually somehow linked with sugar. But it's this simple: cocoa powder does not have sugar in it. It's that simple. Add some good fat and a touch of honey to that powder. Let it set.

Chewy cookies with a touch of the sweetness of honey, add some . . . sugar-free chocolate. You got it.

The chocolate chunks actually have the taste and texture of chocolate, nice and smooth. My sugar-free friend - who really likes chocolate - was so excited that I made her something chocolate. And when she tasted it? Yep, it was a success.

Now, I'm not exactly sure if these are GAPS legal because of the cocoa. Some say "yes", others say "no". I didn't do extensive research about it, but you may decide for yourself, if you're on the GAPS diet.

Chocolate Chunk Cookies (Grain, Gluten, Dairy, Sugar, Corn, Soy, Gum, etc. FREE)
Ideas from Whole New Mom and Nourished and Nurtured

1/2 cup cocoa
1/2 cup coconut oil
2 tablespoons honey, to taste

2 cups almond meal/flour
1/2 teaspoon sea salt
1/4 teaspoon baking soda
1 egg
2 tablespoons coconut oil
1/4 cup honey

1. In a small saucepan combine the first 3 ingredients. Melt together over medium heat, stirring constantly - be careful not to burn this mixture. Pour into a small bowl or dish. Place in the refrigerator or freezer for a few minutes.

2. Meanwhile, preheat the oven to 350 degrees F. Combine all the remaining ingredients to form a dough. Remove the chocolate mixture from the freezer and chop into small pieces. Stir the chocolate chunks into the cookie dough.

3. Drop the dough by a spoon onto a cookie sheet greased with coconut oil. Bake for 7 to 12 minutes, depending on size and shape of the cookies. Remove from oven and let cool on the cookie sheets for a few minutes before transferring to a wire rack (or your mouth ;) ) to cool completely.


~ Hanunyah

Linked to:


Link Party @ the space between

Sugar & Spice by Seven Thirty Three


creative juices @ momnivore's dilemma

Wednesday, November 16, 2011

Rocky Road Bars


Marshmallows, chocolate and nuts. Homemade marshmallows, chocolate chips and nuts are combined in my version here - I searched, combined some recipe ideas and came up with my own version.


And when was the last time you saw desserts in the middle of the road? (it was easy here, because our country road is not very active). But that's what I like - being unique. Whether it's celery 'n' PB cake or me weirdly taking pictures in the middle of the road - it's not a bad thing to stand out from the rest.


If you ever find yourself with extra marshmallows (not very likely in most cases), then make these bars. Or, if you don't have extra marshmallows, make some and then make these. Or, if you want, you may go with the store-bought variety, if your body doesn't take offense to it.


Rocky Road Bars (Gluten, Dairy, Corn, Gum-free)
Adapted from Cookie Madness and AllRecipes.com

2/3 cup sugar
3 tablespoons lard
2 eggs
1 teaspoon vanilla (optional)
1/4 teaspoon baking soda
1/2 teaspoon salt
1/2 cup rice or other gluten-free flour
2 cups nuts, very finely chopped (I used walnuts and peanuts)
2 to 3 cups small marshmallows
1 1/2 cups safe chocolate chips
, divided


1. Preheat oven to 350 degree F. Line an 9x13 inch pan with foil (optional, but would be easier) and spray it with cooking spray or grease with oil.


2. In medium bowl, beat together sugar and lard. Add egg and vanilla and beat until smooth. Add soda and salt until well mixed, then gently stir in flour and 1 cup of the nuts. The batter will not be like cookie dough.


3. Spread in prepared pan. Bake for 15-20 minutes. Meanwhile, melt 1 cup of the chocolate chips. When the crust is done, remove from oven and let cool a few minutes. Spread a thin layer of the melted chocolate on the crust. Sprinkle the marshmallows, remaining chocolate chips and then nuts over chocolate layer. (See note).


4. Chill until set, then cut into pieces.


Notes:
Be sure to sprinkle the nuts on last. I sprinkled them on first, and it made it so that the marshmallows didn't stick very well.


~ Hanunyah


Linked to Gluten-Free Wednesdays by The Gluten-Free Homemaker, Making the World Cuter Monday by Making the World Cuter and Just Something I Whipped Up by The Girl Creative

Sunday, October 2, 2011

31 for 21: Amaretti Peach Cookies

Update - October 5, 2011: I don't know what happened . . . I guess I tweaked out and posted 2 posts on the second of the month, but nothing on the third . . . sorry.

We went to a soccer game today - we won 3-2. It was a very exciting game . . . 

 Anyway, here is a recipe for some sweet, chewy, peach-almond bars.


Amaretti Peach Cookies (Gluten-free, Dairy-free, Corn-free, Gum-free)
Adapted from Chocolate Chip Cookies

1 cup lard
2 cups brown sugar
2 eggs
2 teaspoons almond extract
3/4 teaspoon cream of tartar
1/2 teaspoon baking soda
1/2 teaspoon salt
2 1/2 cups rice flour
1 or 2 peaches, peeled, seeded and finely chopped


Preheat oven to 350 degrees. In a large bowl, cream the lard with sugar until light and fluffy. Add egg and extract. Add cream of tartar, soda, salt and flour. Mix in the peaches. 

Drop dough by tablespoons on a greased cookie sheet OR, spread on a greased cookie sheet. For cookies, bake 7-9 minutes or JUST UNTIL edges are light brown (unless you want crunchy, hard cookies). (The cookies WILL NOT look completely cooked when you pull them out of the oven). For bars, bake about 10 minutes or so, until the top is light to medium brown. Let cookies cool on a wire baking rack on the cookie sheet for 5-10 minutes. This will allow cookies to retain their shape for eating.


~ Hanunyah


Tuesday, July 26, 2011

Fruit Cobbler (GAPS)

This was good! We had it in yogurt.


Fruit Cobbler (GAPS legal)
Hanunyah Creation


1 banana
1 apple
1 peach
2 tablespoons honey, divided
1 1/3 cups almond meal, plus more for topping
1/3 cup yogurt
1 egg


Preheat the oven to 300F. Slice the banana, peeled apple and peach into a baking dish. Drizzle with 1 tablespoon of the honey. Bake for 3 minutes. Meanwhile, mix together the almond meal, yogurt and egg. Pour over the hot fruit. Drizzle with the remaining honey, and sprinkle some almond meal on top. Bake for about 30 minutes, or until cooked through (make sure it isn't doughy on the top).


Before baking


~ Hanunyah

Thursday, July 21, 2011

Peanut Butter Almond Pancakes (GAPS)

Update February 23, 2012: This recipe was good, but a new recipe we made is much better - which may be found here - The BEST Fluffy GAPS Pancakes (so far).

I made up this recipe just a couple hours ago . . . we made other (non-GAPS) pancakes, and decided to make some for the GAPS people, too. They are actually pretty good.

Peanut Butter Almond Pancakes (GAPS legal)


1 1/3 cups almond meal
2 eggs
1/3 cup peanut butter
1/3 cup water

Mix all together and cook in homemade lard or coconut oil.


~ Hanunyah

Tuesday, July 12, 2011

Almond Flour Muffins (GAPS)

These are introduced on Stage 4 of the GAPS diet.

GAPS Almond Flour Muffins

1 1/2 cups almond flour/meal
3 tablespoons coconut oil
2 eggs

Mix all together, spoon into muffin pans until about 1/2 full, and bake at 300F for about 15 to 20 minutes, or until done. This makes about 7 regular sized muffins.


~ Hanunyah

Thursday, April 21, 2011

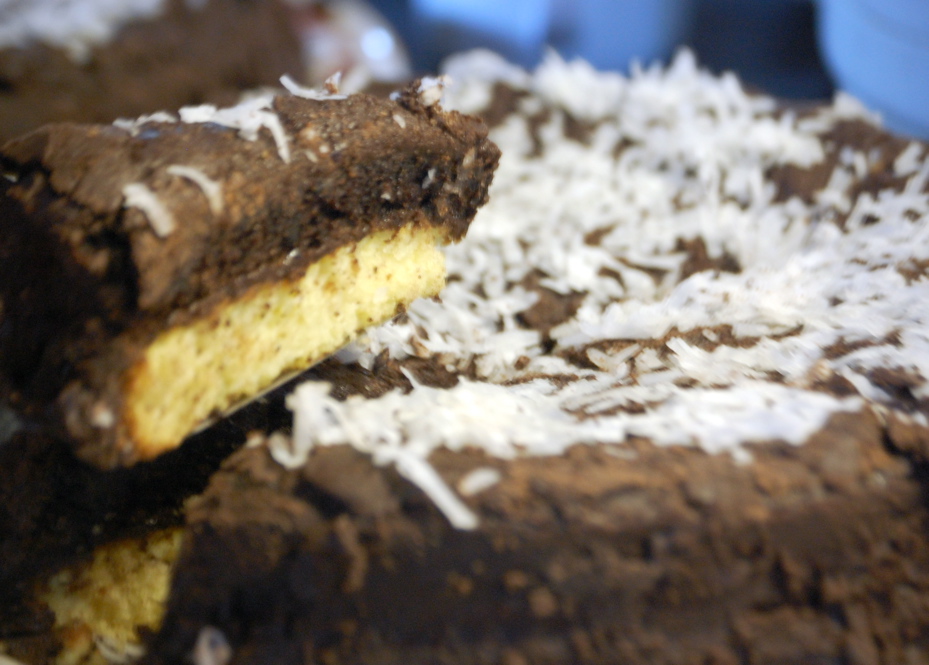
Chocolate Almond Layer Cake

This was a hit! The only thing I would do different next time is use less frosting, as it was too sweet.


     Also . . . this is a "Hanunyah Creation" (I didn't follow a recipe, as always :) ). That's where my blog title came from, because I'm known to never follow a recipe exactly. Anyways, how this cake came about . . . We had no vanilla, so I used almond extract in a yellow cake recipe, and added cocoa powder to the other layer. And the coconut? Well, that was just to make it a bit fancier looking, and to cover up my mistakes :). This was the first layer cake I have done (I have made more layer cakes since I made this one, I'll have to post later).

Sorry for the not very exact measurements . . . sometimes I make things and it's just "dump and mix until it looks right".

Chocolate Almond Layer Cake (Gluten-free, Dairy-free, Corn-free)


Cake:


1/2 cup lard, shortening or oil
1 1/2 cups sugar
3 eggs
2 1/4 cups gluten-free flour (I use rice)
1 teaspoon salt
1 1/2 teaspoons baking soda + 

2 teaspoons cream of tartar
1 1/4 cups milk (I use goat)
1 teaspoon almond extract (somewhere around 1 teaspoon, I don't know exactly how much I used)

Frosting:
Powdered sugar
a few tablespoons cocoa
almond extract (1/2 teaspoon would be good)
water

1. Preheat the oven to 350°F. Prepare one 9x13 pan or two 9-inch round pans (I used two 11-inch round pans) by greasing them thoroughly.

2. Mix the ingredients together in the order they're listed - creaming the softened butter and sugar first, then adding the eggs, flour, salt, baking powder, and finally the liquids. Mix well. 

Immediately pour into the prepared pans and bake for 25-30 minutes, or until the tops spring back slightly when pressed.
Let cool on wire racks for at least 15 minutes, then flip the cakes out of the pans and cool completely.

3. In a bowl, combine all ingredients for the frosting. Put one of the layers on a plate, and frost the top of it. Place the second layer on that, and finish frosting. Garnish if desired with almonds, coconut, chocolate, etc.


~ Hanunyah

Wednesday, October 13, 2010

Simple Hard Candy

I got this recipe out of my book called "The Complete Wilton Book of Candy". It was a recipe for lollipops, but I didn't have molds or sticks, so I poured it on a cookie sheet, and cut it with scissors. This is a good simple recipe for hard candy. I made it 4 times in one day, and made mint flavor, vanilla, lemon and almond (see pics below). I made these for the Tulsa Buddy Walk.

The recipe below I adjusted the directions to how you can just cut it.

Simple Hard Candy
Make sure the pan you use for cooking is of no more than one to two-quart capacity - this is a small recipe.

1 cup white sugar
1/3 cup hot water
1/3 cup light corn syrup
liquid food color
1/2 tsp to 1 tsp extract

Before you begin, Sift confectioners' (powdered) sugar liberally over a marble slab or a large cookie sheet.

1. Combine sugar, hot water and corn syrup in a heavy one- or two-quart saucepan. Place on high heat and stir until all sugar crystals are dissolved. Clip on candy thermometer. Continue cooking, without stirring until thermometer registers 300 F (149 C), then remove from heat. Entire cooking process takes about nine minutes.

2. Add flavoring and food color and stir to blend. Pour onto prepared slab or sheet. Let cool until cool enough to handle, then cut into pieces with scissors (start at the edges).


Lemon

Vanilla

Mint

Almond

A different recipe of hard candy


31 for 21 Blog Challenge


Tuesday, September 21, 2010

GF Neapolitan Cookies

Well, I made these a couple weeks or so ago, but we've been busy lately, so I haven't posted for about a week.
     Ok, I know, the color isn't right, but I didn't have any red food coloring, so I used blue. These were a bit grainy, but still yummy and they got eaten up. I didn't use nuts. I used I think about 3 Tablespoons chocolate chips (melted) for the chocolate layer. I also added a handful of chocolate chips, not melted, to the chocolate dough. I think next time I make these I'll only use about 2 cups of flour (gluten-free, of course), and 1/4 cup of potato starch and/or cornstarch (because the mixture seemed a little dry, and I added a tablespoon or so of lard). The recipe said this makes 72 to 84 cookies. I found this recipe in a Dessert cookbook by Better Homes and Gardens.

Gluten-Free Neapolitan Cookies
2 1/4 cups to 2 1/2 cups gluten free flour, and use some starch so the cookies aren't grainy
about 3/4 teaspoon xanthan gum
1 1/2 teaspoons baking powder
1/2 teaspoon salt
1 cup margarine or butter (I used lard)
1 1/2 cups sugar
1 egg
1 teaspoon vanilla
1/2 teaspoon almond extract
5 drops red food coloring
1/2 cup finely chopped walnuts
1 ounce unsweetened chocolate, melted and cooled to room temperature

1. Line a 9x3x3-inch loaf pan with waxed paper (I used foil because we don't have waxed paper), allowing the ends of the paper to hang over the sides of the pan.

2. In a small bowl, stir together the flour, xanthan gum, baking powder and salt.

3. In a medium mixing bowl, beat the margarine or butter with an electric mixer on medium speed for 30 seconds. Add the sugar and beat until the mixture is fluffy. Add the egg and vanilla, and beat just until the ingredients are combined. Slowly add the flour mixture, beating on medium speed about 3 minutes or until all the ingredients are combined.

4. Divide the dough into 3 portions and place each in a separate bowl. Stir the almond extract and red food coloring into 1 dough portion. Stir the chopped walnuts into the second portion and the melted chocolate into the remaining portion.

5. Pat the pink dough evenly into the bottom of the prepared loaf pan. Pat the dough with nuts over the pink dough. Top with the chocolate dough. Cover the pan and chill in the refrigerator at least 4 hours or in the freezer a few minutes, until the dough is firm enough to slice.

6. Preheat oven to 350 F. Remove the chilled dough from the pan by lifting the waxed paper ends; remove the waxed paper.

7. Using a sharp knife, cut the block of cookie dough lengthwise in half. Cut each cookie block crosswise into 1/8- to 1/4- inch-wide slices. Arrange the slices about 1 inch apart on ungreased cookie sheets.

8. Bake in the 350 oven for 10 to 12 minutes or until the edges are firm and light brown. Cool the cookies on the sheet for 1 minute, then transfer to a wire rack to cool completely.


*Update: Here are some updated pictures - I made them again.


new design + name

As of 1-3-12: I've re-named my blog name (which used to be "Hanunyah's Sweet Creations") to "Ranch Girl's Sweets 'N' Treats". "Sweet Creations" is a pretty common name, so I figured I'd change it to something a little different ;). My URL is still the same, though.

Also, a big thanks goes to my older sister (@ CountryGirlWebDesign.com) who has re-designed my blog and fixed-up all of the HTML. So, I hope you enjoy the new layout!